
Technical article by Ian Dearden
About a year ago, I received 4 cassettes from a friend for audio restoration. On one side of one of the tapes were eight songs by another friend, Andrew Dutney. Although Andrew eventually pursued a long time career in ministry in the Uniting Church, he was also an exciting and talented singer/songwriter, active in the late 1970s and 1980s. I decided that my first task would be to tackle the digitisation and audio restoration of Andrew’s eight songs.
The songs were originally recorded on a Tascam Portastudio TEAC 144 – the original 4 track cassette-based multitrack recorder. Looking back now from the lofty heights of our current computer-based software recording setups, it was very primitive technology – but in skilled hands, it could still achieve marvellous results. In particular, it was possible to internally bounce tracks – for example, you could record on tracks 1, 2 and 3, then bounce across to track 4, and add more instruments in the bounce process. However, there was a fair bit of guesswork involved, and once the bounce was concluded, any further overdubs required recording over the original performances on tracks 1, 2 & 3, and the mono result on track 4 reflected the mix performed during the bounce. Not a task for the fainthearted!!
The multitracks (with internal bounces or not, as the case may be) were then mixed down to a 2 track stereo cassette deck, and that was my starting point for this project. [See Image 1]
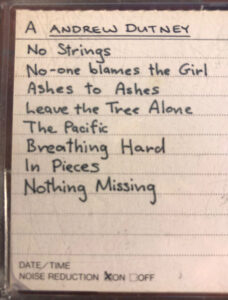
1. Cassette cover sheet
From that starting point, I want to take you, as best I recall it, through the restoration process. Much of the process was a case of ‘suck it and see’, and I didn’t document it as I went through, so in what follows, there’s an element of reconstruction coupled with an imperfect memory, so here goes.
The first step was to transfer the audio on the cassette tape into the computer. I’m currently running Pro Tools 2018.10 on a 2012 iMac using a Focusrite Scarlett 18i20 soundcard. The cassette deck I use is a secondhand Nakamichi 480 sourced from eBay, which replaced a TEAC 2 track deck that I owned for many years, but which died last year. After an initial heart stopper when, despite studiously winding and rewinding the cassette backwards and forwards a couple of times, the tape de-spooled when I played it at normal speed. However, after carefully winding the tape back into the cassette (that’s what pencils are used for in my studio), I did then manage to successfully transfer the audio into Pro Tools.
The initial problem I encountered was a significant imbalance in the left and right stereo audio channels. That could have been dealt with in either of two ways – I chose to adjust the relative volume of the channels coming into Pro Tools using the gain knobs on the 18i20 to match the input volumes by eye on the Pro Tools meters. I could just as easily have imported the mismatched audio, split the audio in Pro Tools using the ‘Track/Split Into Mono’ command, and then rebalanced left and right stereo inside Pro Tools.
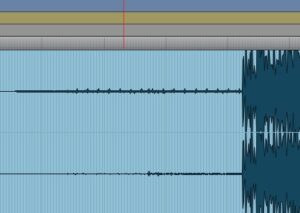
Once I had the imported audio for the 8 songs in Pro Tools as a single clip, I then transferred the clip into iZotope RX7, which is an amazing audio restoration program. There were two preliminary steps required in RX7. I started with the Spectral De-noise module, selecting a small section of the audio without any program material, which then enables the module to ‘learn’ the fingerprint of the tape hiss. With this baseline, the next step is to select all the audio and render it and just like magic, the bulk of the hiss disappears. [See Images 2 & 3]

2. Spectral De-Noise audio selection
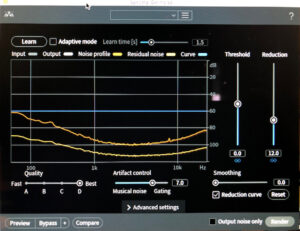
3. Spectral De-Noise module
The second preliminary step was to deal with a particular artefact ‘baked in’ to the original of this particular tape – a repeated but irregular click, primarily on the left channel. RX7 has a module for that – the De-click module. I utilised the Multi-band (random clicks) algorithm, with Sensitivity set at 7.5 and click widening at 0.7ms. As with all the RX7 modules, there is a Preview button which, in conjunction with an ‘Output clicks only’ option, enables you to check if the process will affect the audio you want to keep, as opposed to the clicks you want to get rid of. [See Images 4, 5 & 6]
4. Audio file with clicks
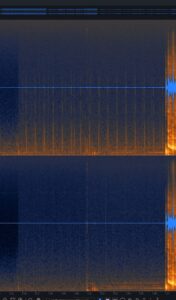
5. Spectrogram file with clicks

6. De-Click module
Once I had an audio clip of the 8 songs that I was happy with, I then went through the ‘Send back’ process, which overwrites the original audio file in Pro Tools with the rendered file (it’s a good idea to duplicate your original file first in Pro Tools before sending it off to RX7 for processing). [See Image 7]
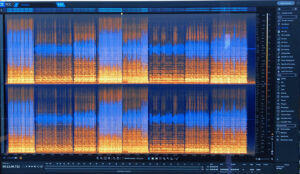
7. Spectrogram file of 8 songs
The next step was to chop up the single clip into 8 separate song files, on separate tracks in Pro Tools, and get down to the nitty gritty of dealing with the audio issues in each individual file. [See Image 8]
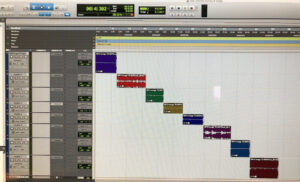
8. Pro Tools edit window with 8 separate tracks
RX7 has a range of modules to deal with the problems that arise. De-clip will help restore audio that has clipped. De-hum will deal with mains hum (it’s a specialist EQ module that takes out mains hum which, in Australia, is 50Hz and its harmonics). The De-plosive module is particularly useful for dealing with plosives in vocals from p’s and b’s, the De-ess module deals with sibilance, and the De-crackle module does just what it says on the tin.
Of particular interest to me in audio restoration work is the Spectral Repair module, which enables you to attenuate or replace audio by utilising the surrounding areas, before and after, or above and below in the audio spectrum; the Music Rebalance module, which can delve into the 2 track audio and readjust the balance between vocals, bass, drums and ‘other’; and the Spectral Editor utilising all the available tools in the full screen spectral display of RX7. The latter task is very much like Photoshop for audio – it’s possible to take out offending parts of the audio, to cut, paste, attenuate and otherwise ‘clean up’ audio in an extraordinarily useful way. As always, the result is heavily dependent on how much time and effort you put into the task, which requires a meticulous attention to detail, a willingness to experiment, and endless patience. [See Image 9]
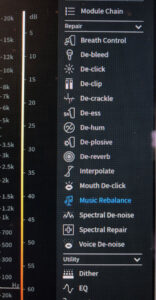
9. RX7 modules
A couple of tracks on this album had bass and/or drum levels that were (to my ears, at least) way too prominent in the mix. Some experimentation with the Music Rebalance module produced a much better mix with (as far as I could determine) no obvious artefacts. Again, it’s just like magic, being able to reach into the heart of a 2 track mix from 33 years ago and remix it. [See Image 10]
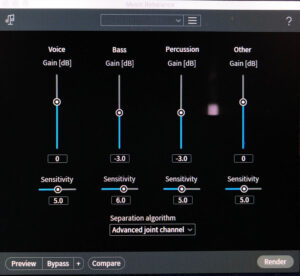
10. Music Rebalance module
Finally, after working my way through each individual song, fixing the specific problems that were thrown up, I then mastered the 8 tracks as an album, in iZotope Ozone 9. I hasten to add that I’m not sponsored in any by iZotope, but I use their software extensively, and find it extremely intuitive and useful. For that matter, I don’t profess any specific expertise in ‘mastering’, but with the expert assistance of Ozone 9, and careful attention to all of the online assistance I can find, I feel that I can produce a reasonable outcome in the circumstances. In this case, I used the Master Assistant process in Ozone 9 to get me in the ballpark for each of the tracks, then tweaked to taste. Once I was comfortable with where each of the tracks were sitting in terms of sound and volume, I then copied them onto a single lane so I could get the balance between all of the tracks into the same ballpark, to make sure that it sounded like an ‘album’, and there you have it. Job done!!
The results of this slow and painstaking work are undoubtedly worth it. I feel like a conservator of paintings – producing an outcome that results in audio emerging fresh from years of ‘grime’ is extraordinarily rewarding.
For those who would like to hear the finished result, head on over to https://andrewdutney.bandcamp.com/album/eight-songs-remastered-2020, where you can enjoy my 2020 restoration and remastering of Andrew’s ‘Eight Songs’.


Leave a Reply
Want to join the discussion?Feel free to contribute!